 Portuguese
  English
  Spanish
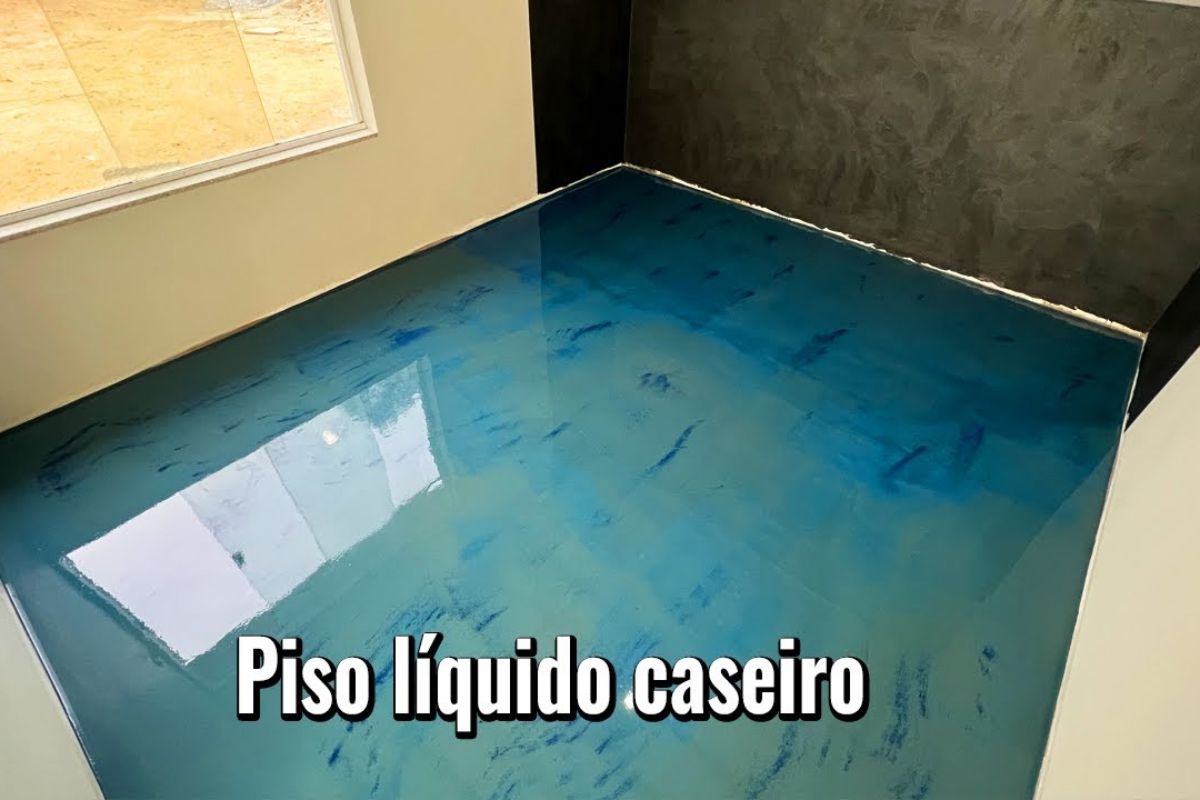
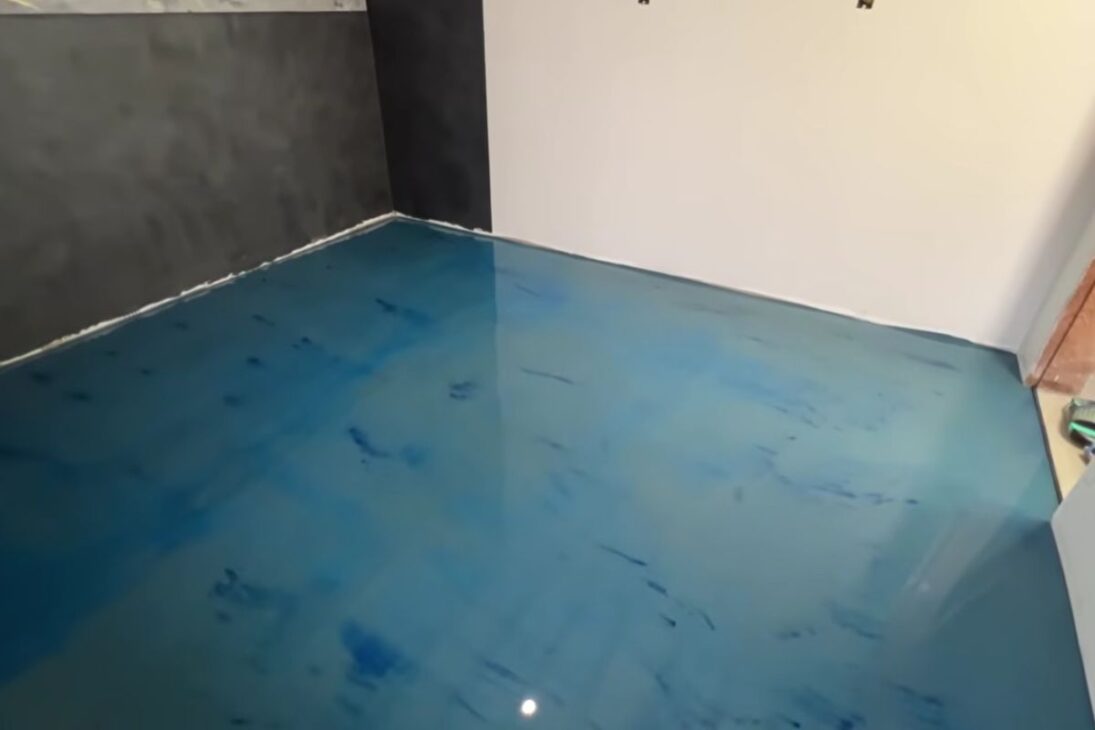
The Pigmented Liquid Floor Applied with Self-Leveling Cement, Resin, and Blue Pigment in a 3-Millimeter Layer Showed That an Old Base, After Being Cleaned, Sealed, and Swept with a Notched Squeegee and Bubble Roller, Can Gain a Uniform Appearance, Modern Shine, and Sufficient Durability Even for an Everyday Use Garage.
The pigmented liquid floor shown in this application started from an old base, full of dirt, stains, and residues from previous work, and was transformed into a smooth, continuous surface that is visually much more modern. The proposal drew attention because it combines a few millimeters of thickness, a relatively simple mixture, and a strong visual change that can completely alter the look of a home, studio, or garage without heavy demolition.
The key point is that the transformation does not rely solely on the color or final shine. It depends on the entire sequence. Clean base, correct sealing, homogeneous mixture, thickness control, and timing between steps are what allow the pigmented liquid floor to go from a beautiful idea to a truly uniform finish. This is what made the result so striking in the studio where the application took place.
The Preparation of the Base Is What Prevents the Finish from Revealing Old Defects
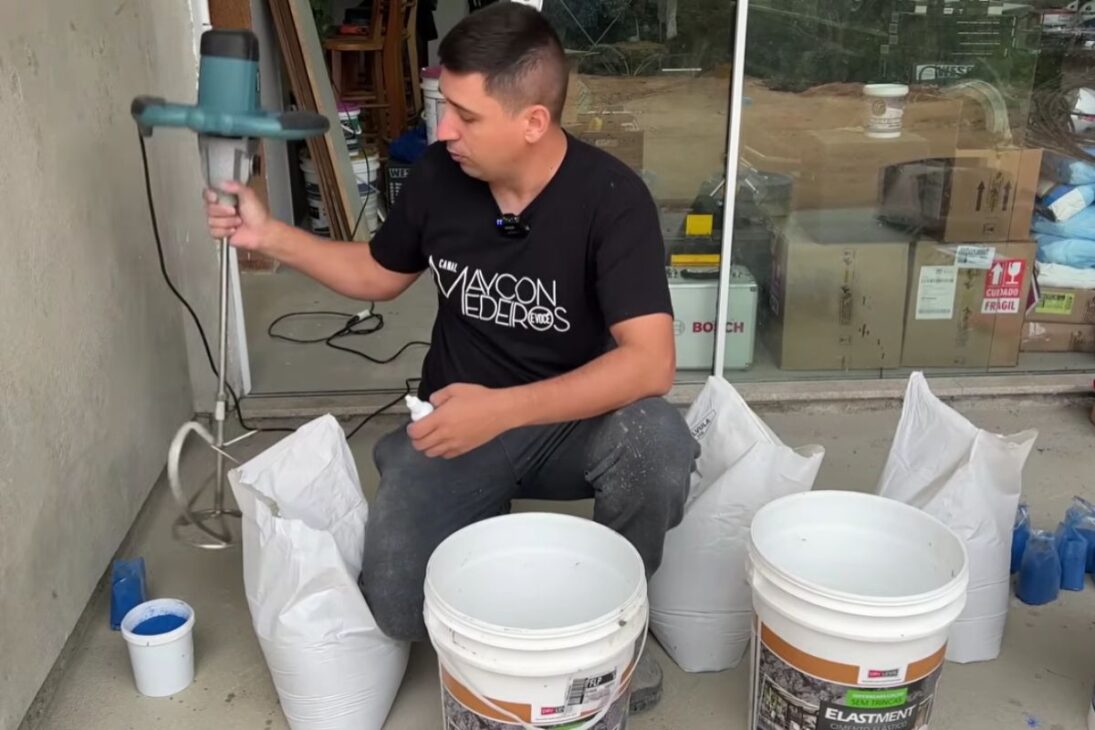
Before any mixture, the surface needed to undergo a heavy cleaning. There were remnants of glue, old burnt cement, paint, and accumulated dirt. Everything was scraped off with a spatula to make the floor as smooth as possible. The explanation is straightforward: since the final layer was designed for about 3 millimeters, any excess above that could level out with the application and show in the finish. In a pigmented liquid floor, the old defect does not disappear by magic; it needs to be reduced first.
-
Only 46 meters remain for Brazil and Paraguay to connect via the Bioceanic Route bridge, the project that will link the Atlantic to the Pacific by land and change the logistical map of four countries in South America.

-
The bridge that holds the largest stone railway arch in the world: built over 100 years ago, destroyed in the war, and rebuilt to continue operating to this day, it still carries trains over the Soča River in Slovenia.

-
Italian giant of 130 tons arrives at the Senna Tower construction site and accelerates foundations: Mite CFA 3436 drills up to 50 m, 750 hp engine, investment of R$ 20 million, unique in Latin America.
-
The adobe house in Monteiro Lobato takes shape with bamboo and clay from the land, a stone foundation, and a roof for the wind; cracks are normal, and finishing with lime turns it into a “common house.”

Larger holes also require prior correction. The guidance used was to fill these spots with a mixture of cement and glue, let it dry for at least 72 hours, and only then proceed with the rest. This avoids differences in absorption and reduces the risk of the old relief continuing to appear. The self-leveling cement helps a lot, but it does not replace a minimally prepared base.
After scraping, the resin stage began. Two coats of a 5-in-1 resin used as a sealer were applied. The first was diluted in water, specifically to penetrate more into the base; the second was applied pure. This preparation with resin is crucial because it controls absorption, improves adhesion, and prevents the self-leveling cement from losing performance when encountering a base that is too dry or uneven.
There was also the delimitation of the environment with specific tape, mainly to hide the seam near the door. This reveals an important practical detail. The pigmented liquid floor may seem continuous and spontaneous when finished, but in execution, it requires well-defined boundaries, an exit reading, and planning the application path so that the applicator can enter, pull, and exit without marking the surface.
Self-Leveling Cement Only Delivers Real Fluidity When the Mixture Is Controlled
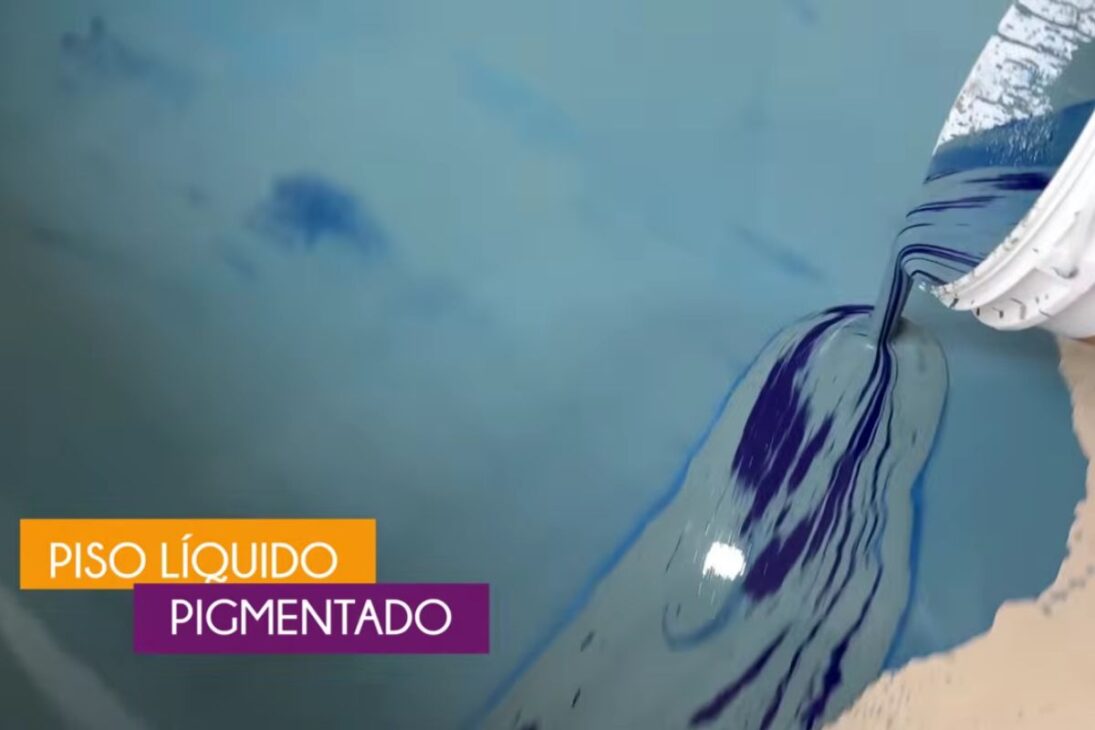
The main mixture was made with self-leveling cement, water, and blue pigment. In the area applied, approximately 10 square meters, three bags of 20 kg were used. The adopted water ratio was 25%, always placed first in the bucket before the gradual addition of the product. This is not a detail. Adding everything at once increases the risk of lumps and compromises exactly what the pigmented liquid floor needs most: uniform fluidity.
The mixture was done in stages, with the powder gradually added in three parts. Only after achieving a homogeneous base was the blue pigment added, which in this case reached 750 grams to achieve a darker shade. The color choice was not neutral. The aim was to create a striking, visible, modern blue that matches the studio’s proposal. When the blue pigment is added too early or without enough homogenization, the color can mislead in the bucket and disappoint on the floor.
After the first mixture, the buckets rested for about five minutes and were stirred again to improve fluidity and dissolve any remaining residue. This helps explain why self-leveling cement has gained this reputation for modern application. It works in favor of leveling but requires a mixture free of lumps and inconsistencies. Poor fluidity creates poor pulling, and poor pulling compromises the entire pigmented liquid floor.
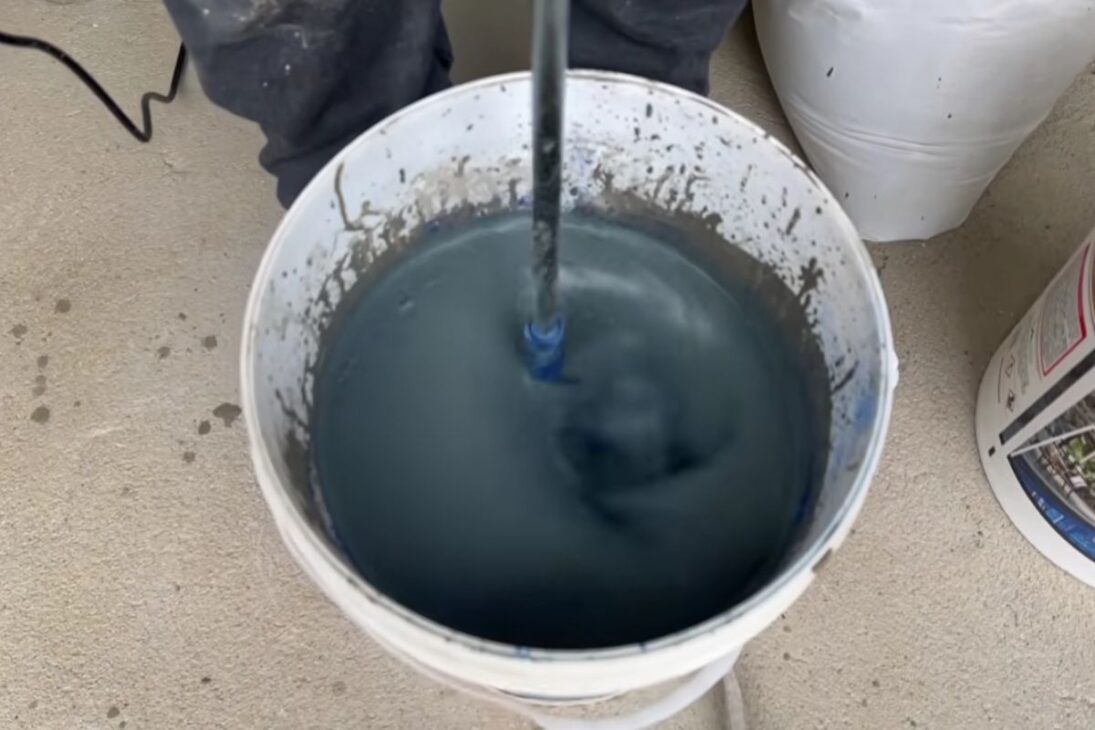
The presence of resin underneath also interferes here. Since the base was already well sealed, the product did not dry too quickly, which gave more ease of application. This is important in a 3-millimeter finish. If the mixture loses its application window, the seam between one bucket and another becomes visible, and the continuous look of the pigmented liquid floor begins to break.
The Notched Squeegee and Bubble Roller Are What Transform Liquid into Finish
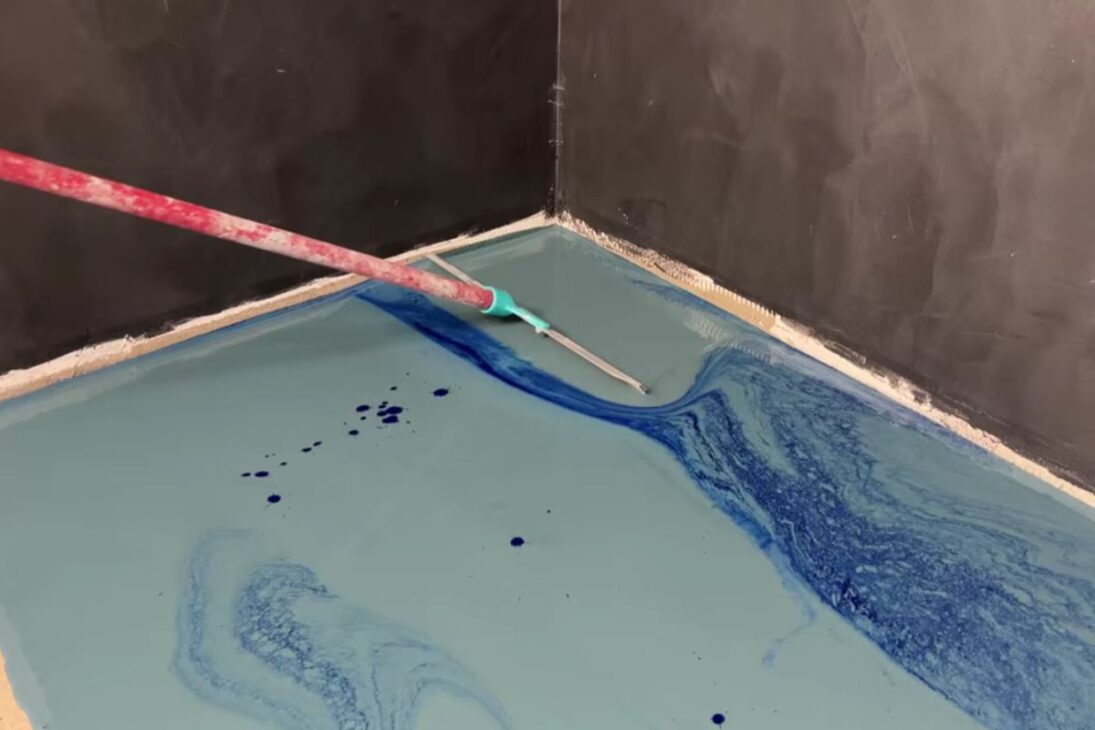
The defined thickness was 3 millimeters, and the one who controlled this was the notched squeegee. It does not push the mixture with force but limits the height of the layer using the weight of the tool itself. This detail changes everything, because it prevents excess in one point and scarcity in another. The pigmented liquid floor does not look good just because the mixture flows; it looks good because the thickness is respected.
The application always started from the back toward the door, with the material being poured close to the walls and then pulled. The squeegee needed to stand upright to truly limit the 3 millimeters. When it reached that height, pulling would stop. This reading of the tool shows why self-leveling cement does not work alone. It settles, but still needs guidance to achieve the final design.
After that, the bubble roller came in. It had two functions: to break air bubbles and help with fine leveling. As the pigmented liquid floor was relatively fluid and the base was already good, the surface worked smoothly, but the extra drops of blue pigment used to create veins and mixes required the roller to spread better and avoid defects. Without the bubble roller, the chance of small imperfections surfacing along with the shine would be much higher.
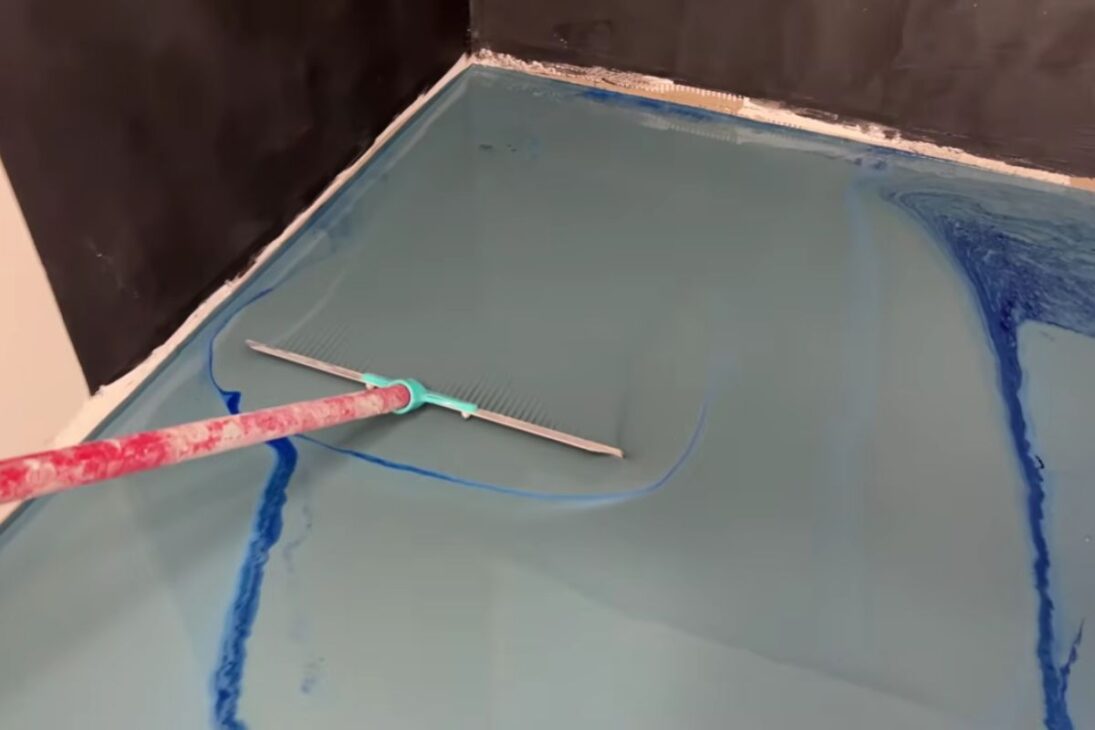
It was also at this moment that one of the most interesting visual effects appeared. The blue pigment veins disappeared and returned as the mixture was pulled, and then slightly rose during the drying process. This shows that the finish does not become fully defined at the moment of application. In the pigmented liquid floor, part of the final reading still organizes itself as the material loses moisture and stabilizes the color.
The Modern Look Impresses, but the Place of Use and Final Protection Remain Decisive
The final result was considered suitable for homes, offices, and high-traffic areas, including garages. This observation is important because it shifts the pigmented liquid floor from the idea of a purely decorative effect. The reading is of a modern finish, yes, but also of a layer designed to withstand everyday use, even in more demanding areas, provided the base is prepared and the complete system is respected.
At the same time, the application was not the final point. The later plan was to apply a high-gloss polyurethane varnish, which reinforces a basic truth about this type of solution: the beautiful look comes from the combination of cementitious layer and surface protection. The self-leveling cement delivers flatness and a colored base; the resin and protective layers complete the visual and functional performance.
This combination helps explain why the finish drew so much attention in the studio and could do the same in a garage or in areas inside the house. The pigmented liquid floor completely transforms the environment with a few millimeters, without traditional covering replacement, and still allows for bolder color use. In the case shown, the blue pigment pulled the aesthetic toward something more contemporary and less neutral.
But the result also delivers a warning. The more modern it looks, the more it depends on disciplined preparation. Poorly scraped base, poorly applied resin, improperly mixed material, and delayed seams appear quickly. The final effect impresses exactly because each step was controlled to make the surface appear simple, smooth, and continuous.
The pigmented liquid floor showed that an old base can change its visual scale with little thickness, as long as self-leveling cement, resin, and blue pigment are used with the right method, rhythm, and tools. In a studio, home, or garage, what stands out is not only the strong color but also the ability to transform concrete into a surface with a much cleaner and more current appearance.
Would you make a pigmented liquid floor like this in your house, or do you think this type of finish works better in a studio and garage?


-

Uma pessoa reagiu a isso.