 Portuguese
  English
  Spanish
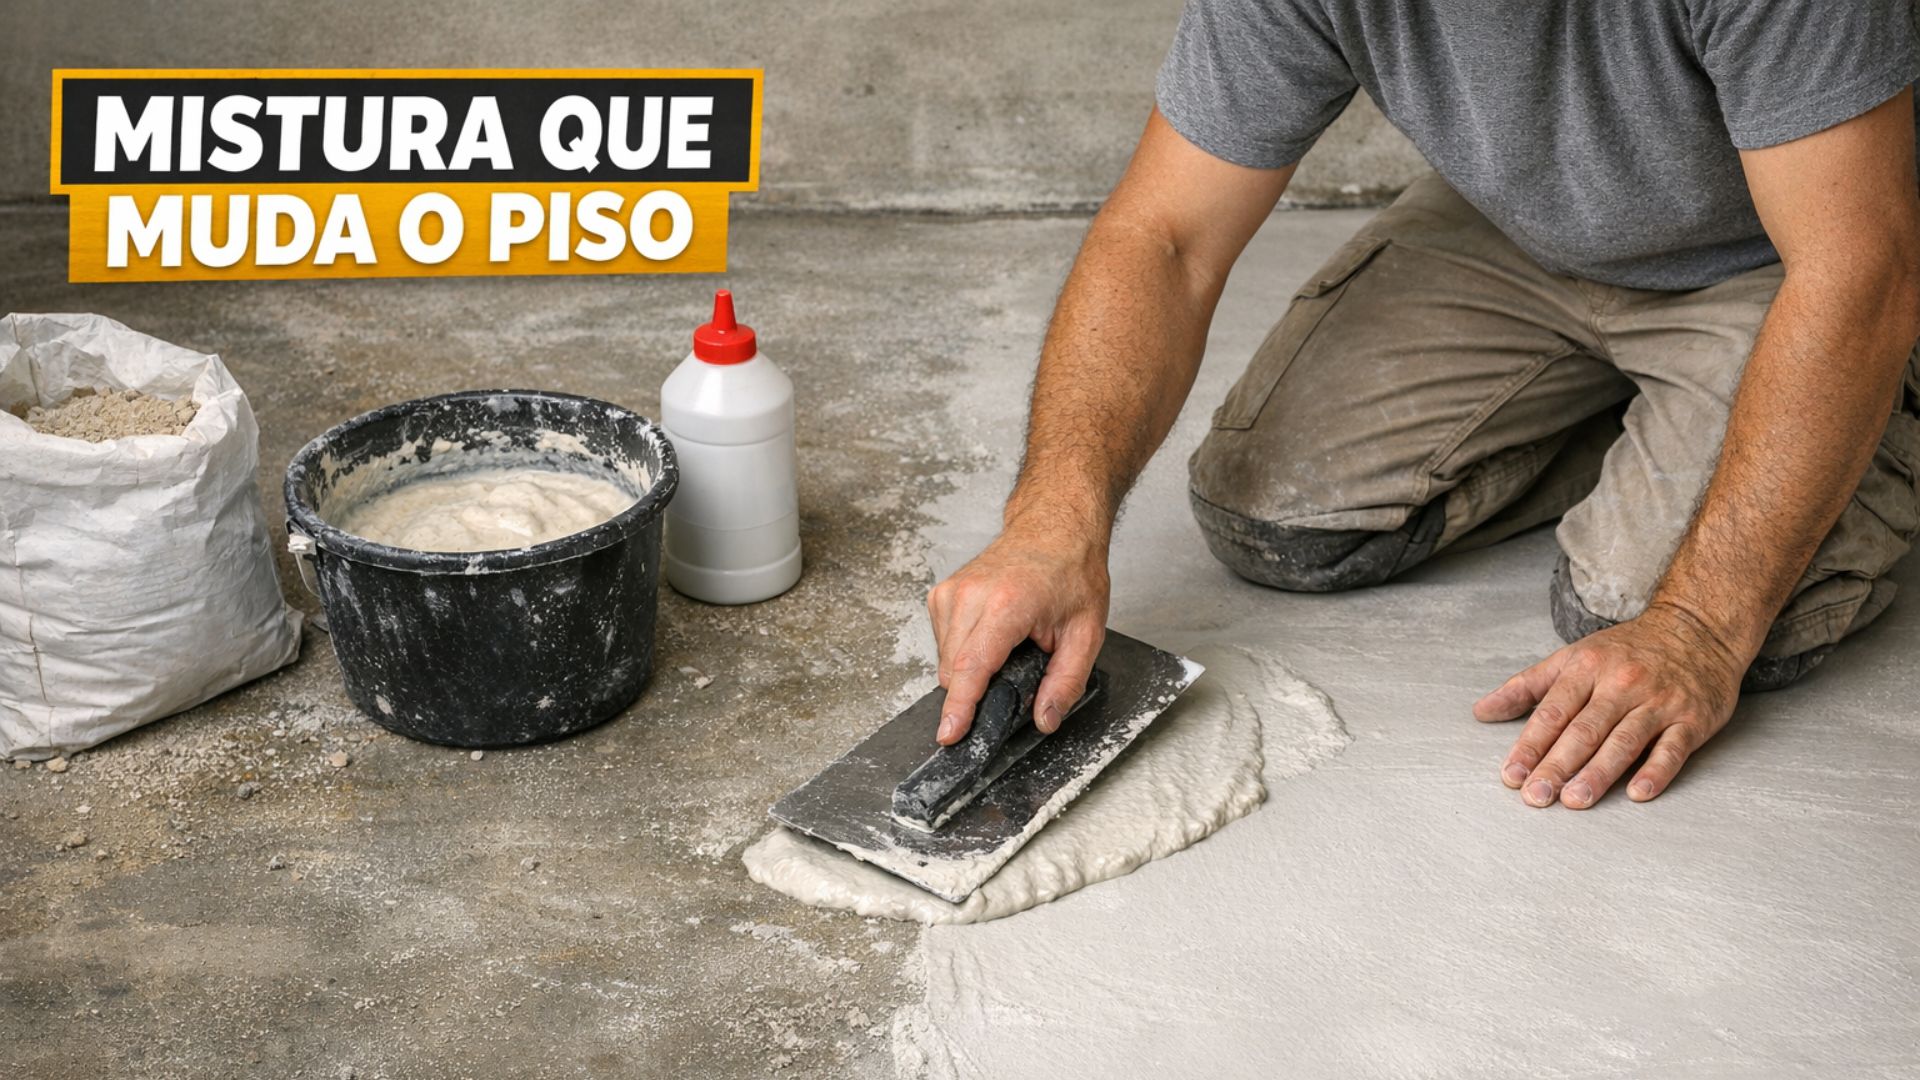
Simple Mixture With White Cement and PVA Glue Gains Space in Renovations and Promises to Reduce Dust From the Subfloor, Create a More Uniform Finish, and Maintain the Level of the Floor, With Application in Two Coats and Short Interval Between Steps, Attracting Those Seeking a Temporary, Cheap and Easy Solution.
The combination made with white cement, white PVA glue, and water has gained strong traction in renovation content and has become a cheap alternative to “hold” dust from the subfloor and give a more uniform appearance to the floor, without raising the level.
The most repeated recipe uses 10 kg of white cement and about 300 ml of white glue, with water added gradually, and is usually applied in two coats with an approximate interval of 1 hour to 1 hour and a half, depending on the climate of the environment.
Although many treat the method as “economical burnt cement,” the practice functions as a thin layer of leveling and temporary finishing, mainly adopted when the floor has not yet received a permanent covering and the subfloor easily releases dirt.
-
Friends have been building a small “town” for 30 years to grow old together, with compact houses, a common area, nature surrounding it, and a collective life project designed for friendship, coexistence, and simplicity.

-
This small town in Germany created its own currency 24 years ago, today it circulates millions per year, is accepted in over 300 stores, and the German government allowed all of this to happen under one condition.

-
Curitiba is shrinking and is expected to lose 97,000 residents by 2050, while inland cities in Paraná such as Sarandi, Araucária, and Toledo are experiencing accelerated growth that is changing the entire state’s map.

-
Tourists were poisoned on Everest in a million-dollar fraud scheme involving helicopters that diverted over $19 million and shocked international authorities.


Economical Burnt Cement on the Subfloor
The so-called economical burnt cement is a simplified adaptation of the traditional finish.
Instead of more complex techniques or thick layers, the proposal is to apply a more fluid mixture directly onto the prepared subfloor.
In practice, the layer creates a more stable and visually clean surface.
It is not a new structural floor, but a thin covering that reduces the typical dust of raw concrete and improves the appearance of the environment.
This resource is usually indicated in specific situations.
Environments with worn-out subfloors, releasing debris, or with an unfinished appearance tend to benefit from the application.
Additionally, it can serve as a base to receive permanent coverings later, without the need to significantly raise the floor level.
White PVA Glue in Construction: What Changes in the Mixture
The most cited glue in this type of preparation is PVA glue, commonly used in school settings and household applications, but which also appears in manufacturer descriptions as a product that can be used with cement mixtures.
In practice, those who resort to the combination seek a more “bonded” paste, with better surface adhesion and less release of fine particles, something also mentioned in technical content aimed at construction and finishing.
Still, PVA glue does not transform the subfloor into porcelain and does not eliminate the need for a final covering when the environment requires high resistance, frequent contact with water, or a more stringent aesthetic standard, such as in wet areas and kitchens.
Preparation of the Subfloor Before Application
Before application, the most common recommendation is to remove loose dust, construction debris, and embedded dirt, as any non-adhering material acts as a “barrier” and can cause peeling, flaws, and stains in the finish, even when the mixture is well made.
The base is usually left only damp, without soaking, to avoid bubbles and help the mixture “grip” better, while open cracks and larger holes are corrected beforehand so that the thin layer does not highlight the defects.
When leveling is ignored, the effect tends to be merely cosmetic and temporary, because the finish follows what exists beneath, exposing undulations and unevenness, in addition to increasing the chance of the floor getting stained in spots where water accumulates.
Step by Step of the Two Coats and Interval of Up to 1.5 Hours
With a clean container, the glue goes in first or together with the water, and the white cement is added gradually until forming a creamy, workable paste without lumps, often mixed with the help of a mixer attached to a drill.
Then, the mixture is spread with a trowel over the damp subfloor, forming a first layer that creates the base, without requiring shine or perfect finish, since the initial function is to fill pores and bond the surface.
After about one hour to one hour and a half, the procedure described in tutorials suggests a light scraping to remove burrs and then the application of a second, more fluid coat aimed at making the floor smoother.
As the thickness tends to be small, the method is sought by those who want to change the appearance of the subfloor without “raising” the floor and without creating steps at doorways, which avoids immediate adjustments in casings, baseboards, and transitions between rooms.
Cheap and Temporary Floor: Where the Technique Appears Most
In houses still without a final covering, the mixture becomes an alternative to make the environment usable while the work progresses, reducing dust dirt in daily life and delivering a visually “closed” surface compared to raw cement.
It also appears in spaces that need to be released quickly, such as bedrooms and living rooms already in use, because the intervention is simple and uses easy-to-find materials, although the cure time and ventilation of the environment influence the result.
In dry interior areas, part of the audience adopts the finish as a temporary floor or even as a medium-term solution, but durability depends on traffic, cleaning, and protection, as the thin layer can wear and stain with use.
Transitional spaces, storage areas, and temporary rooms come into play because the application tends to be cheap, but it is important to treat the result as a functional finish, not a promise of “premium” flooring, especially when there is recurring moisture.
Waterproofing, Sanding, and Pigment: How to Improve the Finish
Those seeking a more pleasing appearance often sand rough spots after drying and, when wanting to change the color, use powder pigment compatible with cement, remembering that variations in mixture and curing can alter the tone between areas.
To reduce stains and facilitate cleaning, the recommendation for compatible waterproofing with the type of use frequently appears, especially where there is more circulation, contact with liquids, or a risk of splashes, such as service areas and hallways.


-

-

-

-

-

-

37 pessoas reagiram a isso.