 Portuguese
  English
  Spanish
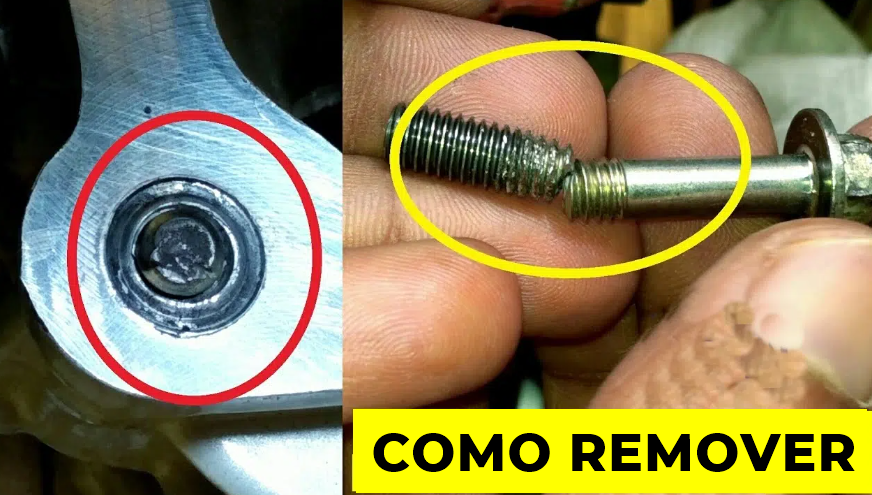
A Broken Screw Can Be a Big Problem, But With The Right Techniques, You Can Remove It Without Compromising The Engine
If you have ever dealt with engine maintenance or worked on mechanical parts, you know how frustrating it can be to deal with a broken screw.
Removing old screws is already a challenge due to rust, corrosion, and damage caused by extreme heat.
However, removing a broken one is an even more complex problem. Without the hex head, there is no way to grip it with a wrench or ratchet, making removal difficult and, in some cases, even a roadblock that can halt work for days.
-
Archaeologists found giant shoes over 30 centimeters near Hadrian’s Wall that survived nearly two thousand years buried and now raise a mystery: who were these Roman soldiers so different from the others?

-
Meta’s new smart glasses are not just for seeing; they use artificial intelligence, analyze your food, summarize messages, and can even change the way you work in professions like engineering.

-
According to an analysis by NASA, only one human-made structure is visible from space, and it is not the Great Wall of China or the Pyramids of Egypt.

-
After 377 years of history, the Brazilian Army will have its first female general: Colonel Claudia Cacho has been promoted to brigadier general by Lula and will receive the sword and command baton this Wednesday in Brasília.


However, there are effective methods to remove a broken screw from an engine. Some of these techniques require specific tools, such as a tap and die set or extractors.
Based on the experience of mechanical professionals, we present five ways to remove a broken screw from the engine, ensuring greater safety and efficiency in carrying out the repair.
Use Heat and Locking Pliers
One of the first and simplest techniques for removing a broken screw is to use heat and locking pliers.
Heat causes the metal to expand, helping to loosen the screw stuck by rust or corrosion.
The ideal is to use an oxyacetylene torch, but it is also possible to employ propane or butane torches.
Before heating the screw, protect heat-sensitive components, such as rubber hoses. Heat the screw until it glows red, and then use locking pliers to try to turn it.
If the screw is extremely corroded, it may be necessary to repeat the process several times before achieving a positive result.
The combination of heat and a high-quality penetrating lubricant can increase the chances of success.
Important: this method does not work if the screw is broken level with the surface, as there will be no way to grip it with the pliers.
Hammer and Chisel
If a significant portion of the screw is exposed, a quick and effective alternative is the use of a hammer and chisel. For this technique, you will need:
- A rubber mallet or small sledgehammer;
- A chisel;
- Pentrating oil.
Apply the oil onto the surface of the screw and position the chisel at an angle so that, when struck, it rotates the screw in the removal direction. Strike the chisel with the hammer until the screw starts to move. If you manage to loosen it slightly, use pliers to complete the removal.
If the chisel is not sufficient, try using a gouge to create grooves on the surface of the screw, increasing the grip of the hand tools.
Welding a Nut onto The Screw
If you have access to a welding machine, you can weld a nut onto the broken screw, creating a new surface to turn it. For this, you will need:
- A MIG or electrode welding machine;
- A wire brush for cleaning;
- A nut of the appropriate size.
Sand the surface of the screw and the nut to remove impurities, fit the nut onto the screw, and weld them together. After the weld cools, use a wrench or ratchet to try to turn the screw and remove it.
Using a Reverse Drill
If the previous methods fail, you can resort to drilling with a reverse thread drill. For this technique, you will need:
- A punch and a hammer;
- A drill;
- Reverse thread drills.
First, use the punch to create a central mark, preventing the drill from slipping. Then, carefully drill in reverse. Often, the drill manages to grab the screw and remove it in the process.
If the drill is not sufficient, try using a screw extractor to complement the removal.
Extractors
If none of the previous techniques work, the last option is to use an extractor. This procedure is more advanced and requires caution. You will need:
- A drill and drill bits;
- A set of extractors;
- A hammer and a punch.
Mark the center of the broken screw with the punch and drill a hole with the drill. Then, insert the extractor into the hole and gently tap with the hammer to secure it. Next, use a wrench to turn the extractor counterclockwise, removing it.
If the screw is extremely stuck, consider combining several of these techniques for better results.
Removing a broken screw can be challenging, but with the right techniques and patience, it is possible to solve the problem without additional damage.
Always use safety equipment, and if you do not feel confident, seek professional help to avoid bigger issues. With the correct methods and the right tools, the removal of broken screws can be done safely and effectively.
With information from slashgear.


Seja o primeiro a reagir!