 Portuguese
  English
  Spanish
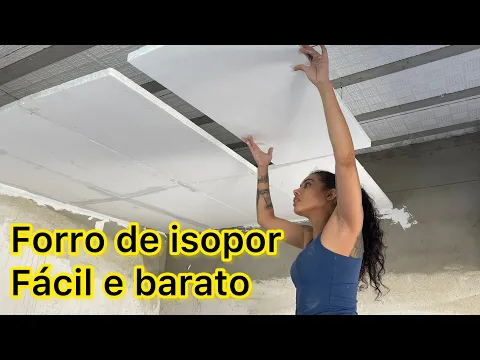
 Putty applied to the polystyrene panels, with wires for support and mesh at the joints, creates a smooth finish, ready for sanding and painting with a more elegant look
Putty has become the most straightforward trick for those who want to transform a simple polystyrene ceiling into a ceiling that looks like plaster, without heavy renovations and without spending much. The idea is to prepare the panels before installation, level the whole set, and treat the joints with mesh and more putty, creating a smooth finish that changes the perception of the environment.
With putty, polystyrene stops looking like a temporary material and starts to have a cleaner and more continuous appearance. The secret lies in three points: precise marking for the ceiling to be level, well-distributed structure with hooks and wires, and a careful finish at the joints with mesh, sanding, and painting.
How to prepare the space to install the polystyrene ceiling
Before any panel, the foundation of the result is the marking. To prevent the ceiling from being wavy, you need to define the height of the drop and mark it on all walls, creating a reference line.
-
Abandoned for over a decade, century-old silos in the state of Recife have been transformed into 251 apartments with curved walls in one of the most complex retrofits ever done in Brazil.
-
Inspired by millennia-old structures, a “differentiated” roof with 463 levels and a capacity for 9,000 people was built on top of a building in India; the tiered roof is almost a kind of giant garden of 9,000 m², reducing energy consumption and promoting interaction among students of Prestige University.

-
Architects are burying plastic pipes 2 meters deep and using ducts up to 30 meters long to cool homes without electricity, with low-consumption fans and natural heat exchange that drastically cuts the electricity bill.

-
Under São Paulo, Line 6-Orange reaches 15.3 km and 15 stations, promising 23 minutes from Brasilândia to the Center and 633,000 passengers per day; with autonomous trains, it will open a partial section in October 2026.


To ensure alignment:
Use a laser level, leveling hose, or hand level
Mark the height of the drop, which can vary from 15 to 40 cm, depending on the ceiling height
Make the marking on all walls to guide the installation
This preparation avoids the most common mistake: installing “by eye” and then trying to correct it with putty, which increases work and worsens the finish.
How to fix the structure with hooks and wires without letting the ceiling drop
With the markings ready, the part that supports everything comes in. The hooks and wires keep the panels firm and prevent the whole set from sagging over time, especially after receiving putty.
Points that make a difference:
Drill the walls, insert anchors, and screw the hooks firmly
Position the wires to support the middle of the panels, not just the edges
Install wires in the opposite direction to lock the structure and prevent sagging
When the structure is well distributed, the ceiling remains stable, and the joints do not “open” over time, preserving the finish of the putty.
How to apply putty to the polystyrene panels and give a plaster appearance
The most important step is to apply putty to the panels before raising everything to the ceiling. This way, you work more comfortably, avoid dirt above your head, and achieve a more uniform finish.
The goal is to create a layer that disguises the texture of the polystyrene and leaves the surface with a more continuous appearance. The application should be controlled to avoid soaking the material and creating excess that will later turn into dust when sanding.
When putty is well applied, polystyrene loses its “granulated” appearance and gains the look of plaster or drywall.
How to position and join the panels on the ceiling without leaving marks at the joints
After preparing the panels with putty, it’s time to install them and join the seams with the right technique.
Step by step:
- Position the panels and secure the wires to the upper structure
- Fit one panel next to the other and always secure with the wires
- Apply mesh tape to the seams
- Spread putty over the mesh to level and smooth everything out
The mesh is the detail that changes the result because it helps to prevent cracks and gives body to the putty at the joints. Without it, the chance of a line appearing at the seam increases.
Sanding and painting: the finish that transforms the ceiling
The finish is what makes the trick look professional. After the putty dries completely, it’s time to sand and paint.
To finish well:
- Wait for the putty to dry for about a day before sanding
- Sand mainly the seams, without damaging the rest of the panels
- Paint the ceiling in the desired color to uniform and enhance the effect
The painting helps to hide small imperfections and gives that finished ceiling look, with an appearance more expensive than it actually cost.
What changes in the environment when polystyrene takes on the look of plaster
This type of solution works because it changes the visual reading of the space. A smooth ceiling with invisible seams gives the impression of a more sophisticated finish, improves the sense of organization, and enhances the lighting, furniture, and colors of the environment.
With putty, the ceiling gains a cleaner aesthetic without requiring demolition. The final result depends less on the material and more on the care in marking, the structure, and the finish.
And you, would you use putty to transform a polystyrene ceiling into a plaster-like ceiling or would you prefer to invest directly in plaster even spending more?


Seja o primeiro a reagir!