 Portuguese
  English
  Spanish
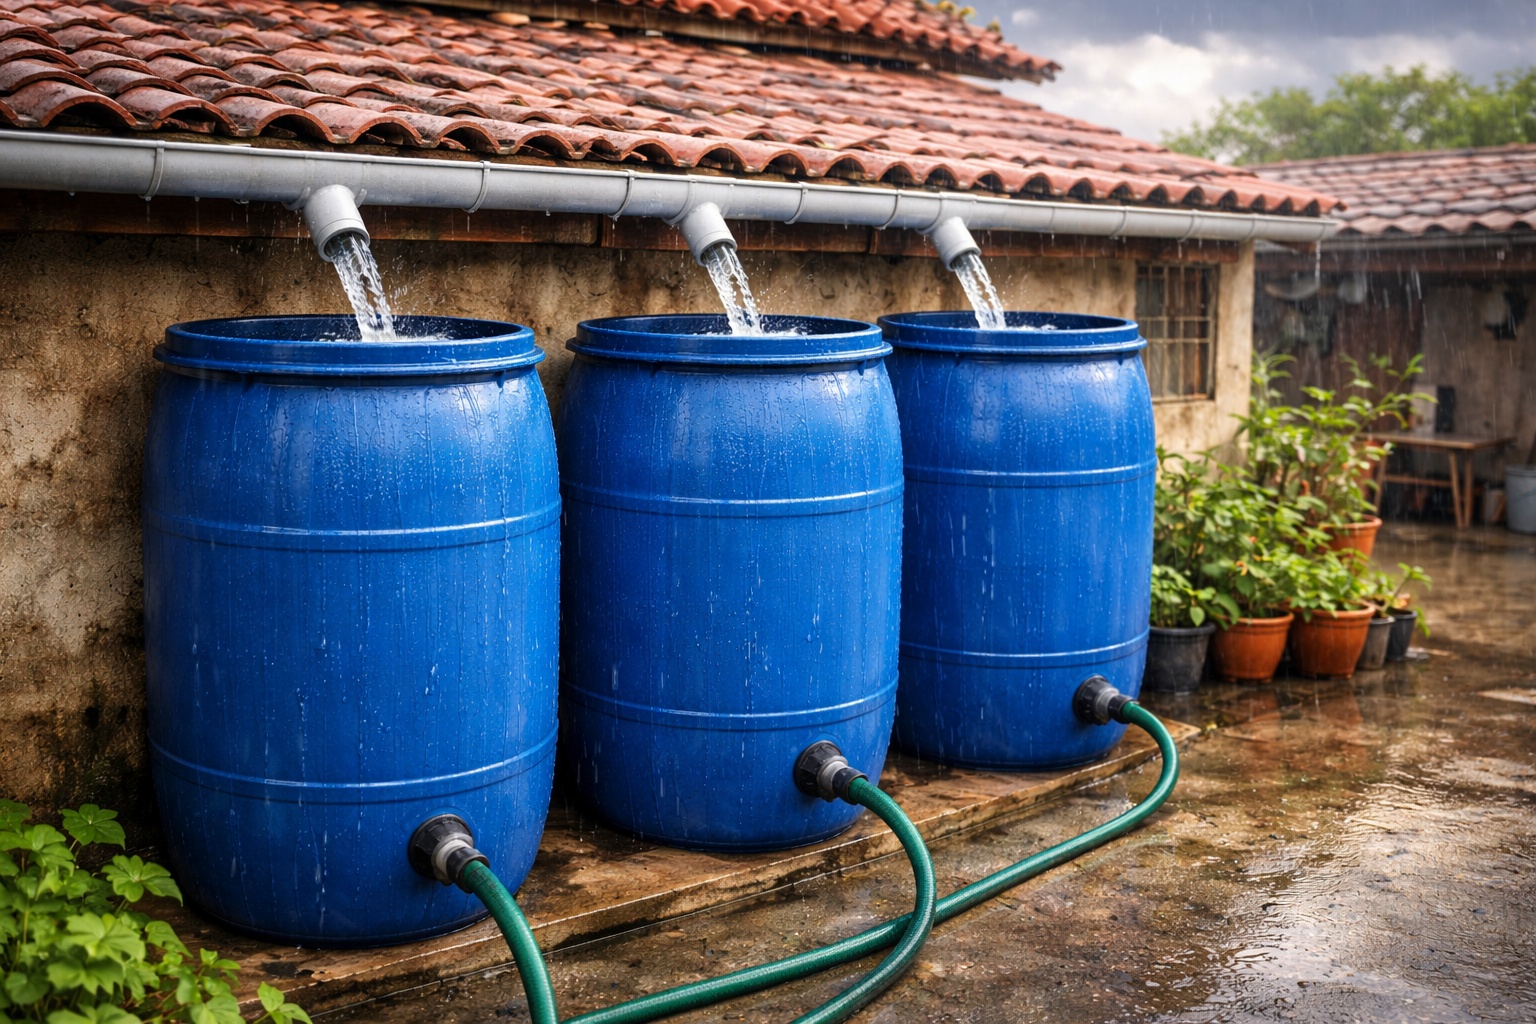


Rainwater Harvesting with a 200-Liter Tank: Affordable System Connected to the Gutter Reduces Waste and Can Cut the Water Bill by R$ 30 to R$ 50 per Month
On a 15-square-meter roof, each millimeter of rain equates to 15 liters of water flowing through the gutters straight to the sewage. A moderate rain of 10 mm, common in nearly all of Brazil, throws away 150 liters. At 20 mm, it’s 300 liters wasted. Over the course of a year, depending on the region, this can mean thousands of liters of usable water going down the drain while the bill at the end of the month keeps rising. The simplest and cheapest solution to capture this water is also one of the least known: a 200-liter tank directly connected to the roof gutter.
The complete rainwater harvesting system—tank, connections, basic filter, and faucet—costs between R$ 150 and R$ 300 to set up, can be installed in one afternoon without specialized technical knowledge, and, in practice, usually saves between R$ 30 and R$ 50 monthly on the water bill for a typical family of three.
The harvested water does not need to be potable to generate savings: it can be used for watering plants, washing the yard, filling the washing machine, washing the car, or flushing toilets, reducing the consumption of treated water in tasks that do not require potability.
-
China completes the most critical section under the Yangtze River with the intelligent tunneling machine Linghang, excavating 11.32 continuous kilometers at depths of up to 89 meters and transforming the Chongming-Taicang tunnel into a landmark that redefines the scale of high-speed rail engineering in the 21st century.

-
The government of São Paulo surprises South America with a plan to transform the famous Ibirapuera with underground shops, air conditioning, and a 25-year concession in a billion-dollar project that expands the audience, alters a protected area, and provokes an immediate reaction.

-
With a lifespan of up to 60 years and a cost up to 30% higher than conventional concrete, self-healing concrete is already being used in Brazil to eliminate leaks, reduce maintenance, and is changing the real cost of construction projects.

-
Engineered wood CLT challenges steel and concrete and promises construction that is up to 2x faster with a lower environmental impact in modern civil engineering.


Mathematics of Rainwater Harvesting on the Roof: How Much Each Millimeter Yields in Liters
The logic of rainwater harvesting is straightforward: 1 millimeter of rain falling on 1 square meter of roof generates exactly 1 liter of water.
This relationship allows for precise calculations of potential savings. A 15 m² roof under a 10 mm rain captures 150 liters. The same roof under 20 mm captures 300 liters. There is no complexity: it’s simple and predictable multiplication.
In the Greater São Paulo region, for example, a “normal” rain usually varies between 10 mm and 20 mm. This means that with each moderate rain, an average residential roof of 25 m² can capture between 250 and 500 liters of rainwater, sufficient volume to replace treated water in various household activities.
Rainwater Harvesting with a 200-Liter Tank: Materials, Cost, and What Is Really Worth Buying
The most basic and functional homemade rainwater harvesting system in the gutter depends on four sets: reservoir (the tank), connection between the gutter and inlet, simple filtering for coarse debris, and an outlet point with a faucet.
The 200-liter tank typically costs from R$ 80 to R$ 150 when new. Used, it can be priced from R$ 40 to R$ 80. In practice, the best cost-benefit is to look for tanks that previously transported food items, such as juices and cooking oils, because they are safer for household use and usually cheaper.

The critical point is to avoid tanks that have stored chemical products, even after washing, because residues can persist and contaminate the water. Metal drums can work, but they rust over time and can alter the quality of the collected water.
PVC connections generally range from R$ 20 to R$ 40 and include a 90° elbow (in 75 mm or 100 mm, according to the gutter/conductor), a piece of pipe (in many cases, 1 meter resolves the situation), PVC glue, and the adaptations to install a garden faucet (normally 3/4”).
For the faucet, the significant item is the flange adapter with threads and the correct seal to prevent leaks.
In filtering, the simplest version costs from R$ 10 to R$ 30 and already resolves a good part of the problem: mosquito screen or plastic sieve to retain leaves, twigs, and insects before entering the tank.
Those wanting to step up can use a commercial self-cleaning filter, typically between R$ 50 and R$ 150, but the system continues to function with the simple screen if maintenance is performed.
Lid and Screen Cover
The lid or screened cover, priced between R$ 10 and R$ 20, is a sanitary safety component: it prevents mosquito entry (dengue, zika, and chikungunya), reduces evaporation, and avoids animals accessing the reservoir.
There is also the disposal of the first rain, optional but recommended, generally between R$ 30 and R$ 50 when assembled simply. This can be done with a 2L PET bottle or a capped PVC pipe, associated with a valve to drain afterward. The function is to retain the first liters that wash dirt from the roof and gutters.
With these elements, the estimated total cost usually ranges between R$ 150 and R$ 300 for a new system. If the tank is used and the solution is very basic, it is possible to fall to R$ 80 to R$ 150, without losing the essence of the harvesting system.
Installing the Tank in the Roof Gutter: Step-by-Step Assembly of the Rainwater Harvesting System
The first step is to choose the location. The tank should be placed close to the downspout of the gutter, the vertical conductor.
The ideal placement should be accessible for maintenance and cleaning, protected from direct sunlight (to reduce heating and algae growth), on a leveled and firm base, because a full tank weighs about 200 kg, and, whenever possible, near points of use (garden faucet, sink, hose, outdoor area).
If conditions permit, elevating the tank by 30 to 50 cm with concrete blocks or a brick base improves gravity pressure at the faucet, making it easier to use without a pump, especially for short hoses and yard washing.

In preparing the tank, cleaning should be done with water and neutral soap, followed by repeated rinses until no odor remains. If the tank has transported cooking oil, it is advisable to use degreasing detergent and rinse thoroughly. To install the faucet, the hole should be at the bottom of the tank, usually 5 to 10 cm from the bottom.
A hole saw needs to have the exact diameter for the flange adapter. The correct installation includes the flange on the inside, a rubber seal, and screwing the faucet from the outside, with enough tightening to avoid leaks. A simple test before connecting to the gutter is to fill the tank with a bucket of water and check for leaks at the flange.
At the water inlet, the hole at the top of the tank should be near the side, receiving the pipe from the gutter. The 90° elbow facing downwards helps avoid splashing and reduces the chance of direct dirt entry. Sealing can be done with appropriate rubber and silicone, ensuring there is no slack.
Connection in the Gutter
To connect to the gutter, the intervention occurs in the vertical conductor. You cut the pipe at the point where the water will be diverted to the tank, at a height that allows the pipe to enter the top of the reservoir without effort.
Next, install a diversion with a “T” connection and elbows, creating a path for the tank and maintaining a downward continuity path.
This is important: when the tank fills, the water needs to continue flowing down the conductor and not overflow into the yard. There are commercial diversion kits ranging from R$ 40 to R$ 80, but the common PVC solution works if the assembly is well-aligned and sealed.
If you choose to dispose of the first rain, it goes before the tank. The idea is simple: the first volume of water carries dust, soot, and debris from the roof. This volume is diverted to a small reservoir that fills first; when it is full, the system overflows, and the “cleaner” water follows to the tank.
After the rain, you open a valve and empty the reservoir for the next precipitation. A common rule of thumb is to discard 1 to 2 liters per square meter of roof. For 15 m², this amounts to between 15 and 30 liters. It can be assembled with several connected 2L PET bottles or a bucket with a valve at the bottom, following the logic of drainage and overflow.
Filter for Rainwater in the Tank: How to Reduce Dirt, Leaves, and Improve Quality for Non-Potable Domestic Use
Before entering the tank, the water should go through simple filtering. The first level is the leaf filter: mesh or sieve at the entrance of the pipe leading to the tank. A kitchen plastic sieve fitted on the end of the pipe can work as long as it is secured with a clamp or wire and cleaned regularly.
For those wanting to improve the quality, there is a homemade filter of sand and charcoal, useful for non-potable uses and for reducing turbidity and odor. It can be made with a cut 2L PET bottle, layering the internal layers in the correct order for flow: fine gravel, fine washed sand, granulated activated charcoal (commonly found at pet shops), and a layer of cotton or blanket.

The water enters from the top, passes through the layers, and exits from the bottom cleaner. To maintain performance, this filter needs to be redone every 2 or 3 months, depending on the volume of rain and the dirt on the roof.
Maintenance of the Rainwater Harvesting System: Cleaning the Gutter, Mosquito Control, and Filter Replacement
Rainwater harvesting works well when maintenance is not neglected. The gutter needs to be cleaned every 3 or 4 months to remove leaves, branches, and bird droppings because a dirty gutter means dirty water in the tank and faster clogging of the filters.
Cleaning the tank, in general, should be done every 6 months. The procedure is to empty it, scrub the internal walls with a brush, and rinse several times. If there is light entry, algae can grow; hence the importance of a well-sealed and ideally opaque lid.
Controlling mosquitoes is mandatory. Weekly checks should be made to see if there are larvae in the reservoir. If there are, it is a sign of failure in sealing or screening. The fix is to reinforce the sealing, use finer mesh, and ensure no openings are exposed.
Screens should be washed monthly. Homemade sand and charcoal filters should be redone every 2 or 3 months. With that, rainwater harvesting remains safe for the intended uses.
Savings on the Water Bill with Rainwater: Real Calculations for a Family of 3 and Return on Investment
A typical family of 3 consumes an average of 13.8 m³ (13,800 liters) per month in Brazil. Of that total, about 30% goes to toilet flushing (4,140 L), 25% for personal hygiene (3,450 L), 20% for laundry (2,760 L), 15% for cooking (2,070 L), and 10% for cleaning floors, yards, cars, and plants (1,380 L).
The captured rainwater can replace all or part of the consumption in flushing, laundry (tank and machine), cleaning floors and yards, watering plants, and washing the car.
If the family uses rainwater only for the 10% of outdoor activities, the potential savings are already 1,380 L/month.

If including flushes, laundry, and general cleaning, the reduction can reach 50%, equivalent to 6,900 L/month, depending on routine, rain volume, and storage capacity.
In financial terms, the example presented illustrates the logic: an original consumption of 13.8 m³/month may cost around R$ 108 (average residential tariff, varying by city).
Reducing to 10 m³/month could drop to about R$ 68, generating an approximate savings of R$ 40/month or R$ 480/year. With an installation cost of R$ 200, the system pays for itself in about 5 months. Considering the average lifespan of the tank is 10 years, the accumulated savings can reach R$ 4,800.
Is Rainwater Potable? Recommended Uses, Prohibited Uses, and When to Treat Properly
Rainwater should not be treated as potable directly. Even with a homemade filter, it may contain atmospheric dust, air pollutants in urban areas, roof residues (bird droppings, pollen, and fungi), and metals, especially if the roof is metallic.
Thus, it is not recommended for drinking, cooking, brushing teeth, and, as a safety rule, it is not ideal for bathing without specific treatment. For washing dishes, it would only make sense with detergent and a final rinse in treated water.
On the other hand, rainwater is broadly suitable for non-potable domestic uses: watering ornamental plants and gardens (preferably wetting the soil rather than directly on edible leaves), washing floors, sidewalks, walls, and outdoor areas, flushing toilets, washing clothes in the machine or tank with soap, washing cars, bicycles, and tools, and even filling construction tanks for preparing mortar and concrete.
If there is a real need to make it potable, this requires additional treatment steps, such as fine filtration (ceramic or activated charcoal appropriate), boiling for 15 minutes at a full boil, chlorination with hypochlorite at the correct dosage with contact time, or ultraviolet light systems designed for water treatment. For the economic purpose of the system with the tank connected to the gutter, non-potable use is the safest and most efficient path.
Environmental Benefits of Rainwater Harvesting: Less Flooding, Less Pressure on Water Sources, and Lower Energy Costs
The harvesting of rainwater is not just about savings on the bill. When thousands of homes capture part of the water that would go directly into urban drainage, less volume arrives at the sewers and galleries all at once, which eases the system during heavy rains and can reduce flooding in some scenarios.
There is also an effect on water sources: every liter of rainwater used in non-potable tasks is one less liter taken from rivers, reservoirs, and aquifers. In cities with a history of water crises, this helps reduce pressure on the system, even if it does not replace public infrastructure policies.
There is also the energy aspect: treating and pumping water to residences consumes electrical energy. By using rainwater, you indirectly reduce the energy consumption associated with treatment and distribution, which also lowers emissions linked to the process.
Finally, there is an important behavioral effect: those who install a homemade cistern begin to observe how much it rains, how much they use, and how much they waste. This awareness tends to drive other consumption reduction habits.
Rainwater Harvesting with a 200-Liter Tank is One of the Cheapest Solutions to Save and Reduce Waste
The homemade cistern with a 200-liter tank does not alone solve Brazil’s water crisis, but the combined effect can be enormous.
If each of the 72 million Brazilian households captured just 100 liters per month, it would mean 7.2 billion liters monthly reused, totaling 86.4 billion liters per year—86,400 Olympic-sized swimming pools that would not need to be extracted from rivers and aquifers for uses where the water does not need to be potable.
On an individual level, installing a tank connected to the gutter is one of the best cost-benefit actions: low investment, quick return, measurable impact, simple installation, and manageable maintenance. It saves money every month, reduces pressure on water sources, can alleviate urban drainage in some scenarios, and increases the family’s water security during rationing periods.
Rain has always existed. Its gutter has always been there. The drainage has always carried away thousands of liters of usable water. In many cases, what was missing was just a 200-liter tank, simple connections, a basic filter, a well-sealed lid, and an afternoon of work to transform waste into savings.


Caro jornalista, bom dia! Galão é uma unidade de volume, usualmente existe o galão americano com 3,785 litros, o galão imperial, inglês, com 4,54 litros e o galão brasileiro com aproximadamente 3,6 litros. Acredito que o termo mais apropriado para “galão” usado na reportagem poderia ser tambor de 200 litros ou barril de 200 litros. Abraço.
Bem a captação de água eu já faço há muitos anos, ocorre que eu tenho uma piscina com capacidade de 100 mil litros então eu capto toda água de chuva das calhas e jogo na piscina com isso eu não preciso colocar a água tratada para preenchimento, porque em epoca de estiagem evapora em media 500 a 700 litros por dia, e posso exceder 20cm o que equivale a 10000 litros, claro que após é tratada a água da piscina com os devidos produtos e a água se torna interessante para mim com isso realmente eu economizo muita água porque a cada 2 cm da piscina corresponde a 1000 Litros de água então se eu tiver que colocar 10 mil litros de água isso seria praticamente 20 cm da piscina então seriam 10.000 Litros então é uma economia bastante grande. Para lavar cercas de alumínio, muros, carros, pedras, calçadas, adaptei uma bomba junto ao lava jato fazendo com que o excesso de água da piscina captada eu consiga jogar para o lava-jato e com isso dar pressão suficiente para que eu possa usar o lava-jato utilizando essa água que eu captei da chuva quando estiver com exesso de agua na piscina.
Tenho 2 galões de de 200L já com panos de filtro, é ótimo. Ajuda bastante.
Lavar carro, calçada, molhar as plantas,uso na primeira lavagem da roupa na máquina,.caso falte da até pra lavar a louça e joga no banheiro. Já estou pondo cloro de água (não água sanitária,caso precise. Pretendo por no filtro de barro quem sabe.