
 Portuguese
  Spanish
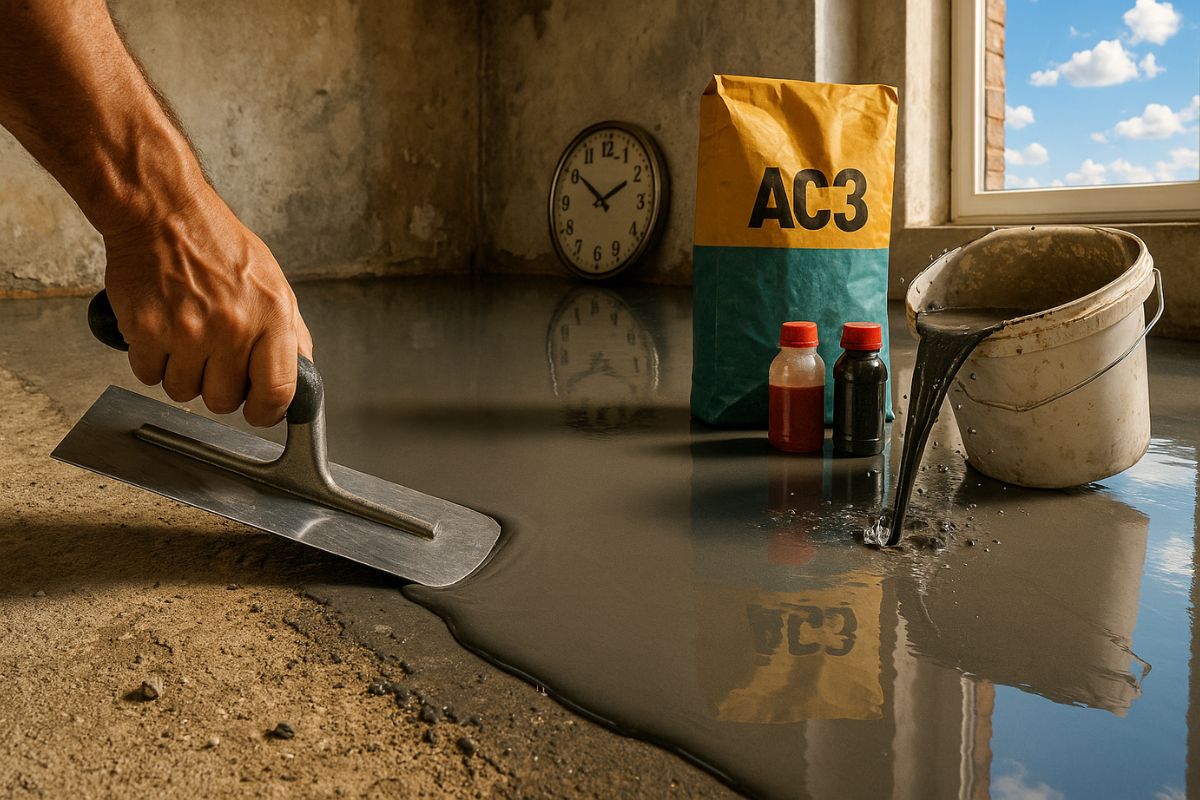
With AC3 Mortar, Common White Glue, and Simple Pigment, Homemade Self-Levelling Burnt Cement Technique Creates a Continuous Floor That Imitates Professional Finish Without Having to Change the Coating
If the idea is to completely abandon the thick floor and give the house the look of a complete renovation without spending on porcelain or industrial flooring, homemade self-levelling burnt cement emerges as a powerful shortcut. Right at the first stage, the combination of AC3 mortar with a clean base prepares the ground to receive a fluid layer of cement that spreads, levels, and creates a smooth floor that resembles professional work.
Next, the mixture of cement, water, glue, and pigment transforms homemade self-levelling burnt cement into a kind of rigid blanket, with a more resistant effect than many common floors. In about 24 hours, the resident can wash, wax, and achieve the sheen of “new floor” using only simple materials from the hardware store, without a specialized team and without breaking anything inside the house.
What Makes Homemade Self-Levelling Burnt Cement Different
Burnt cement has always been a desired solution for those seeking a continuous finish that is easy to clean and has a modern look.
-
Bruno Guimarães, 28, Misses Crucial Penalty Against Norway in World Cup After Replacing Vinicius Jr.

-
Inspired by a school lesson on Africa’s water crisis, a young boy raised money through chores to fund a well that transformed a Ugandan community.

-
Brazilian Construction Worker Moves to France, Earns Up to €2,500 Monthly with Home Renovations, Gains Social Media Attention

-
US Navy Sinks USS Oriskany with 230 kg of C-4, Creating World’s Largest Artificial Reef in 37 Minutes


The difference here is the use of homemade self-levelling burnt cement, prepared with AC3 mortar, common cement, glue, and pigment, directly over the thick floor.
Instead of removing the existing floor or applying multiple heavy layers, the technique works in two phases: first, the AC3 mortar creates a firm, adhesive base, then the homemade self-levelling burnt cement acts as a finishing film, spreading with the help of a trowel and correcting small irregularities.
The result is a smooth, continuous floor ready to receive wax in no time.
Preparation of the Thick Floor Before Any Application
Before thinking about the mixture of homemade self-levelling burnt cement, the condition of the thick floor dictates everything. The surface needs to be:
Free of loose mass remains
Without heavy dirt or accumulated dust
Visually clean after a good wash
In the original video, the first step is “to make your floor nice and clean”, scraping off the “little masses” stuck to the brick or subfloor and washing the area well.
This cleaning prevents adhesion failures and stops the homemade self-levelling burnt cement from peeling off or starting to loosen tiles over time.
First Step: AC3 Mortar as the Base of the System
The heart of the anchoring is the AC3 mortar. It serves as the bridge between the thick floor and the homemade self-levelling burnt cement. The process follows a simple logic:
Spread the AC3 mortar over the entire area of the thick floor, using a trowel and float
Aim for the smoothest finish possible in this first layer, pulling the mass and filling defects
Allow to dry for about 1.5 hours, at most to around 2 hours
A critical point of the technique is not to let this AC3 mortar cure overnight before applying the homemade self-levelling burnt cement. The interval is short on purpose.
With the mortar still “young,” the adhesion between the two layers becomes much stronger, forming a rigid structure that withstands use in environments like garages, kitchens, and bathrooms.
Second Step: Recipe for Homemade Self-Levelling Burnt Cement
With the AC3 base ready, it’s time for the homemade self-levelling burnt cement recipe.
The mixture is made in a bucket or sturdy container, always starting with the water and the cement.
In the example shown, the reference ratio is:
About 1 kg of common cement at a time
Approximately 100 g of glue for every 1 kg of cement
For those using a whole bag of cement, the reference is 1 liter of glue mixed into the mass
Black checkered pigment, in liquid or powder form, to darken the mixture and give it the burnt cement tone
The glue acts as an adhesion and flexibility additive, helping the homemade self-levelling burnt cement stick better to the base and withstand daily use.
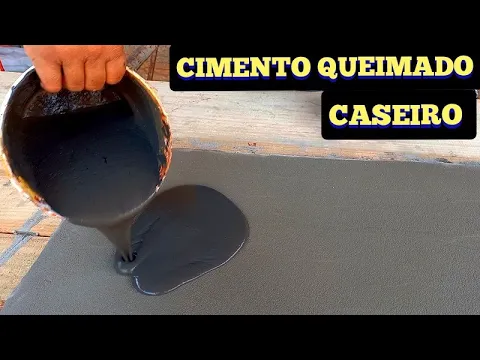
First, mix the cement well with the water and glue. Then, the pigment is incorporated until the mixture achieves a uniform dark color, typical of modern burnt cement.
How to Apply Homemade Self-Levelling Burnt Cement
With the mixture ready, we come to the stage that defines the final look.
The application of homemade self-levelling burnt cement is done directly over the already dry AC3 mortar layer on the surface, but still fresh. The step-by-step is as follows:
Pour small portions of the mixture onto the floor
Spread with a trowel, pulling the mass and leveling in constant movements
Work in sections, avoiding leaving puddles or very thick areas
Correct little scratches and imperfections by going back over the areas that turned out lighter or poorly covered with the trowel
The mixture has a fluid behavior, which helps the homemade self-levelling burnt cement fill small imperfections and create a continuous plane.
Practice improves the result: even those who have never worked with this can gradually refine their technique and achieve a visually uniform floor with no visible seams.
Curing Time, Washing, and Shine with Clear Wax
After applying the homemade self-levelling burnt cement, the stage of patience begins.
The floor needs about 24 hours to dry and gain initial strength.
This interval ensures that the mixture of cement, glue, and pigment forms a firm layer, without deep marks from shoes or tools.
After this time, the finishing process is simple:
- Wash the floor to remove surface dust residues
- Wait for it to dry
- Apply common clear wax, found in stores, in 3 to 4 coats
It is this clear wax that produces the “mirrored floor” effect.
The homemade self-levelling burnt cement becomes intensely shiny, easy to clean, and looks like a new floor, especially in high-traffic areas such as living rooms, kitchens, and garages.
In Which Environments to Use and What to Expect from the Resistance
In the original demonstration, the applicator emphasizes that homemade self-levelling burnt cement can be used in:
- Garage
- Kitchen
- Bathroom
- Indoor environments with exposed thick flooring
According to the report, the final layer is very resistant and does not easily come off, precisely because the AC3 mortar functions as an adhesive base and the glue mixed with the cement increases the surface cohesion.
For those struggling with dust from the subfloor, difficulty in cleaning, and an overly rustic appearance, the solution offers a visual leap without relying on ready-made floors or major renovations.
Advantages of Using Homemade Self-Levelling Burnt Cement Instead of Replacing the Floor
When comparing the technique to purchasing ready-made coatings, several points stand out:
Use of simple materials easily found in any hardware store
Ability to work independently, without a specialized team
Transformation of a thick floor into a smooth, shiny, and continuous finish in about a day
Reduction in breaking things, debris, and transporting heavy materials
This is not a factory industrial floor, but a practical solution for those who want to greatly improve the visual appeal of their home while spending little and utilizing what already exists as the base.
And you, in which environment of your home would you be most courageous to test this homemade self-levelling burnt cement first to see the difference before and after?


